Monday, December 22, 2008

Holiday Coffee and Dessert Get Together


Thinking about hosting a holiday party? You still have time. Should it be a cocktail party, brunch, lunch or maybe dinner? So many choices, everyone is so busy these days, not to mention the cost of hosting a holiday party.

Here's an idea....a holiday coffee and dessert get together. Coffee and dessert you say...who does that anymore? You're right, but think about it. That is why it would be fun and different, nobody does that anymore.

When I was growing up it wasn't uncommon for friends and family and stop over after dinner for coffee and dessert. It wasn't necessarily planned, as a matter of fact we always had a Sara Lee dessert in the freezer or a box of cookies in the house to serve with coffee. It didn't have to be extravagant, it was a spur of the moment thing.

I wanted to plan a get together with a few of my close neighbors, but when I realized that I didn't have much time before Christmas, I remembered back to the days when I was a kid and coffee and dessert was served. So, you guessed it. I called each of my neighbors and invited them over for coffee and dessert if they were free on a particular night.

The house looked so festive with the Christmas decorations up, that I decided to use my Mother's good china to make it even more special. I had already made Christmas cookies and fudge that I would serve. A chocolate cake with white cream cheese frosting(my favorite) and cheesecake with raspberry sauce(my husband's favorite) would complete the table. Coffee(regular and decaf), tea and oh yeah, after dinner drinks. My favorites, baileys Irish cream(it's great in your coffee), amaretto and brandy.

Let me tell you. It was the most enjoyable evening I have had in a long time. It was so nice just being able to chat with our neighbors. There was no stress, no running around making sure everyone had a drink or if they wanted more to eat. I served everyone when they sat down and asked that they please help themselves to more coffee, dessert and after dinner drinks when they were ready.

So, if you want to have a get together for the holidays or anytime of year. Think about a coffee and dessert get together. I think you will enjoy it as much as we did. Happy Holidays!

Saturday, November 15, 2008

Mini Chocolate Eclairs

Making eclairs can be intimidating. This Paula Deen recipe is so easy you just have to try it. I just want to mention that you will need patience. I say that because it's one of those recipes that you will need to spend time at the stove stirring.

I suggest you get everything measured and lined up before starting. It makes it easier so you can just add while you stir. The pastry is made first. So far so good, everything was going according to the directions.

While the pastries baked in the oven, I started on the filling. It did seem like forever before the filling thickened to a mayonnaise consistency per the instructions. Don't even think about taking the easy way out and substituting instant pudding. The time spent stirring to get the right consistency was worth the wait. The filling was absolutely delicious.

The eclairs were so good, we had no leftovers for the next day. They were addicting. I guess because they are so light you don't realize how many you've eaten. This is a great make ahead dessert. The eclairs can be frozen in an airtight container and taken out of the freezer before you are ready to serve.


Ingredients for pastry:
  • 1/2 cup (1 stick) butter (margarine can be used according to the recipe, but butter tastes so much better)
  • 1 cup sifted all-purpose flour
  • 4 eggs


    Ingredients for filling:
  • 3 cups whole milk
  • 3/4 cup sugar
  • 1/2 teaspoon salt
  • 6 tablespoons flour
  • 3 eggs, lightly beaten
  • 2 teaspoons vanilla extract


    Ingredients for icing:
  • 2 squares (2 ounces) unsweetened chocolate
  • 2 cups sugar
  • 1 cup whipping cream


    Preheat the oven to 400 degrees F. Grease a cookie sheet or line with parchment paper.

    To make the pastry: Bring 1 cup water and the butter to a boil. Add the flour and stir constantly until the mixture is smooth and forms a ball. Remove from the heat and let cool. Beat in the eggs, one at a time. Drop the dough by teaspoonful on to the prepared cookie sheet. Bake for approximately 30 minutes, or until golden brown. Set aside on a rack to cool.

    To make the filling: Combine the milk, sugar, salt and flour in a medium saucepan. Cook slowly until mixture thickens, stirring constantly. Add the eggs and cook, stirring, until the mixture is even thicker, about the consistency of mayonnaise. Remove from the heat, let cool and add the vanilla.

    With a serrated knife, slice the pastry puff lengthwise but not all the way through. Pipe the custard into the center.

    To make the icing: Melt the chocolate in the microwave at full power for 30 seconds; place in a medium saucepan and stir, then add the sugar and cream. Cook over medium heat until soft ball stage, 240 degrees F on a candy thermometer. Let cool and beat until smooth. Ice the tops of the eclairs.

    Note: I didn't have a pastry bag to pipe the filling onto the pastry shell. I substituted with a zip-lock bag. I filling the zip-lock bag with filling and then snipped off tip. It worked pretty well. Also I didn't have a candy thermometer to check the temperature of icing. I had to wing it. It turned out great.

    Source: Paula Deen and Friends Cookbook, copyright 2005
  • Sunday, November 9, 2008

    Pumpkin Mascarpone Pie


    Thanksgiving is only a few weeks away, so I thought you might be interested in a new pumpkin pie recipe. I actually came across this recipe in a Bon Appetit magazine last year. Pumpkin pie isn't really a favorite of mine. It's okay, but I never felt it had that WOW factor every time I made it.

    Because I was hosting Thanksgiving last year I wanted my pumpkin pie to be something everyone would remember. Well, Pumpkin Mascarpone Pie is the pie your guest will remember this Thanksgiving. The texture of the pie is so smooth compared to traditional pumpkin pies made with evaporated milk.

    The recipe calls for one 9-inch pie crust. You can make your favorite pie crust recipe and chill it while preparing the filling. If you are not into making pie crust, you can purchase a ready made pie crust(there are some good ones out there).

    Since finding this recipe I have always made it with a regular pie crust and the pie seemed to get better every time I make it. I recently made it with a graham cracker crust. To be honest, I prefer this pie with a regular pie crust. The pie made with the graham cracker crust tasted too sweet. I would advise you to make this pie with a regular pie crust per the original recipe instructions.Hope you give it a try this Thanksgiving. I know you will enjoy it.


    Preheat Oven to 350 degrees F.

    Make your favorite 9-inch pie crust recipe or purchase one 9-inch Pie Crust. Chill Pie Crust while making the pie filling.

    Ingredients for filling:

    • 1 cup canned pure pumpkin (15 oz.)
    • 1 cup (packed) golden brown sugar
    • 2 large eggs
    • 1 teaspoon fresh lemon juice
    • 1 teaspoon ground cinnamon
    • 1 teaspoon ground ginger
    • 1/2 teaspoon ground nutmeg
    • 1/2 teaspoon vanilla extract
    • 1/4 teaspoon ground cloves
    • 1/4 teaspoon salt
    • 1 8-ounce container mascarpone cheese*

    Using an electric mixer, beat pumpkin and sugar in large bowl until well blended.
    Add eggs and next 7 ingredients and beat until blended.Next add the mascarpone cheese and beat just until mixture is smooth.

    Bake pie until custard is set, about 55 minutes.

    Transfer pie to rack and cool.


    This recipe can be made 1 day ahead, tent with foil and chill.

    *Mascarpone Cheese can be found in your local supermarket with the specalty cheeses. I have noticed recently that there is a mascarpone cheese with coffee. Be careful when purchasing, you will need the plain mascarpone cheese.

    Source: Bon Appetit Magazine, November 2007.

    Sunday, October 26, 2008

    Friday Night Pizza


    Friday night is Pizza Night in our household. We normally order a pizza, however, I've recently been unimpressed with the consistency of the pizza from various pizza shops in our area. Good one week, not good the next, overcooked, undercooked, cold, veggies not cooked just thrown on the pizza. You get the idea, I'm sure you find the same thing where you live.


    This past Friday, I decided to make my own pizza. Don't get me wrong, I have tried in the past. The taste was excellent, however, I have stayed away from making pizza at home for a couple of reasons.

    Number One: I have a hard time making dough. You are probably saying "What", she's crazy, it's the easiest thing to make. I agree, the recipes for making dough are easy, but I somehow mess it up. Some people have told me it's possible that the water I use to combine the yeast might be too hot. Some say that I may be kneading the dough wrong. Whatever the reason, I screw it up somehow.

    Number Two: I can't stretch the dough to make it fit on my pizza pan. I've tried all size pizza pans. Sometimes I get big holes in the dough after trying to stretch it to make it fit. Sometimes I get it to fit perfectly, only for it to shrink on the pizza pan after baking.

    So, you can understand now why I order pizza rather than make it at home. The taste is always great, it's just a struggle to get it to look right. Well, this past Friday I am proud to say, it was fantastic. Not to mention, if I must stay myself, it didn't look half bad. My husband commented, "Tell me again why we are buying pizza when the quality of yours is so much better and cheaper". Of course, that made me feel good.

    Before I started I call and consulted with a couple of family members, who by the way make the best pizza. It's so good they really should open up a pizza shop. Their homemade dough the best ever. I guess I was the family member who missed the dough making gene when they were handed out. Anyway, back to my story...

    I used dough purchased at the bakery and with a rolling pin, rolled out each side very slowly. I didn't pull the dough, I just kept pushing the rolling pin toward the outside edges of the dough. No holes yet. Things were looking good so far. Then I put some olive oil on my fingertips and gently pushed the dough along the outer rim of the pizza pan so that it would hold. I baked the dough without toppings for about 5 minutes in a 400 degree F oven. When I took the baked dough out of the oven, I put on all the toppings. I put the pizza back in the oven for another 10-12 minutes or until I saw it bubbling and edges were brown.


    I was so proud of myself. My persistence paid off. Now I need to learn to make my own dough, but that's another blog.

    Sunday, October 12, 2008

    Recipe Binder


    I pride myself on being organized. Seriously, ask my family or friends. They actually make fun of me, but I'm a good sport and play along. They have gone so far as to move things on me to see if I would notice. Of course, I would notice and put everything back in it's proper place.


    Anyway, back to my story. I lacked organizational skills when it came to keeping my recipes. Recipes that I find in magazines, get from family or friends and recipes I print from the Internet. I am embarrassed to say, they get thrown in one of my many cookbooks. They aren't even categorized by groups like entrees, desserts, breads, appetizers, etc. They are just randomly thrown in whatever cookbook that isn't already filled with papers. It worked for me, but it was a mess and took me forever to find a recipe.


    I did have this bright idea (I get them occasionally) of scanning all my recipes onto my computer. I made a file on my computer desktop called "Recipe Box" and put in categories so each recipe could be filed properly. So, one weekend I got started. Everything was going great. I was scanning and throwing away the paper copy. Following weekend, I continued. It was great. I had about 30-40 more recipes to scan and our scanner started giving me problems. If I have to start and stop, I had the time and patience. After three hours of fighting with the scanner, I called it quits. I will try again another day. Well, needless to say, I tried everyday for a good couple of weeks. Every time I thought something was scanning in, I got the awful beeping noise "ERROR, ERROR, ERROR". So much for finishing. I gave up, so what if I had a few papers in my cookbooks, it would be better than before. I had gotten almost all of my recipes scanned in my "Recipe Box" folder. Whenever I needed a recipe, I could just go to the computer, pull it up and start cooking. I was so happy, I was no longer "Recipe File Challenged".


    I boasted about how wonderful it was. If someone wanted one of my recipes, I would say "no problem, I have all my recipes on my computer, it will take only seconds for me to Email it to you". Silly me. Why did I think I was so smart. I knew something would go wrong and it did. Evidently, my scanning skills needed some work. When scanning I didn't actually notice that I was missing some of the recipe. Now, I'm in panic mode....remember, I went paperless and threw out all the hard copies of my recipes. I'm still trying to get some of my missing recipes back, but in the meantime came up with another solution to keeping recipes. I went out and bought a couple of 3-ring binders, clear protector sheets and binder tabs to categorize recipes. It doesn't cost much and sometimes you can find some really pretty binders to match you kitchen colors. It was actually fun.


    I laid everything out on the living room floor one Sunday, turned on the TV (Lifetime Channel had some great movies on that day) and put the binders together. It's a good chance to actually sort out duplicate recipes or throw out recipes that you don't want. So, if you are "Recipe File Challenged" like me, try this. Think of it this way. On a cold Sunday, you can stay in your PJ's, turn on the TV, throw all your stuff on the living room floor and put your Recipe Binders together. You can have a productive, yet relaxing Sunday. Oh, one more thing. You have to reward yourself by getting "Take Out" rather than cook. After all, you've been busy all day, you need someone to cook for you today. By the way, the Recipe Binders makes a great gift too, especially as a shower gift or as a gift for a new home. Start someone off with a pretty binder and inserts, add a couple of your favorite recipes and trust me, they will love it. Maybe they'll even invite you to dinner some night..

    Sunday, October 5, 2008

    Spicy Spanish Rice


    Spanish Rice from scratch you say! I know, I know, it's so easy to open up that box of Spanish Rice rather have to chop up ingredients. I have to admit, the boxed spanish rice is good and I still use it occasionally, however, making it from scratch doesn't really take that much time and it's so much better. There are alot of recipes for spanish rice out there, but I have my own recipe that I made up awhile ago. I remembered it the other day when I was trying to figure out what to make as a side-dish. I was getting bored with potatoes and had all the ingredients in my pantry to make the spanish rice so I got cooking immediately. I have to tell you, I did have to rename my recipe from Spanish Rice to "Spicy" Spanish Rice. Let me explain...I normally buy Stewed Tomatoes marked "Italian Recipe". Evidently, I somehow bought Stewed Tomatoes marked "Mexican Recipe" by mistake. The Mexican Recipe Stewed Tomatoes have jalapenos, garlic and cumin in it. Of course, I didn't realize my mistake until I tasted the sauce and almost fell over. I never noticed that the can was marked Mexican Recipe and I had already added the red pepper flakes to the sauce so it wasn't like I could take anything out. What' a girl to do? Even though my husband doesn't really like spicy food, I really didn't want to throw it out only to start again. I decided not to tell him about my mistake and see if he noticed anything different. He did notice, but everything turned out well. Once the initial shock of flames coming out of your mouth subsides, it actually is quite good. Although my husband would prefer a potato with dinner, he did go back for a second helping of the rice so I figured that was a good thing. I updated my recipe now to use Mexican Recipe Stewed Tomatoes going forward. So, when you are bored with old standby side-dishes, try this recipe, I am sure you will agree, it's better than the boxed stuff. Enjoy!

    Ingredients:

    • 3 Slices of Bacon, chopped
    • 1 Red or Green Pepper, chopped
    • 1 Medium Onion, chopped
    • 1 15 oz. Can Stewed Tomatoes, Mexican Recipe
    • 1 15 oz Can Tomato Sauce
    • 1 Teaspoon Dried Oregano
    • 1/2 Teaspoon Garlic Powder
    • 1/2 Teaspoon Red Pepper Flakes
    • 2 Cups Uncooked Minute Rice
    • Shredded Taco or Mexican Cheese (optional)
    • Salt and Pepper

    Cut bacon in to bite size pieces and cook on medium heat in large skillet until crisp. While the bacon is cooking, chop red pepper and onion. Once the bacon is cooked, remove from the pan onto a paper towel to drain and set aside.

    Next, add red or green pepper and onion to pan. Then cook until tender. Add stewed tomatoes, tomato sauce, oregano, garlic powder and red pepper flakes to skillet. Stir together. Add salt and pepper to taste.

    Stirring occasionally, let sauce mixture come to boil on medium heat for 10 minutes. Stir in uncooked rice and bacon to sauce. Reduce heat to low letting rice and bacon simmer in sauce for 10 additional minutes. Continue to stir occasionally to prevent sticking.
    Remove from heat, add shredded cheese, if desired, and set aside until ready to serve.

    Sunday, September 28, 2008

    Lemon Ricotta Cookies with Lemon Glaze


    On a recent episode of Everyday Italian, I watched Giada De Laurentiis make Lemon Ricotta Cookies. It caught my eye because the cookies looked similar to a cookie recipe that I have, however, my recipe doesn't call for ricotta cheese. The ricotta was actually the ingredient that I found very interesting in Giada's recipe. I guess I wasn't sure how ricotta cheese would taste in a cookie. Well, if you have been following my blog, you know by now that I have a sweet tooth. Even though I wasn't expecting anyone over and didn't have a special occasion to bake anything for, I just couldn't resist trying this recipe. So after printing the recipe off the FoodNetwork.com website and a quick trip to the supermarket, I was mixing up a batch of Giada's Lemon Ricotta Cookies. BEWARE....you can't stop at eating just one cookie. These cookies are so light, I dare you to try and eat only one cookie. What was really funny is our friends stopped over unexpectedly later that night. The cookies were still on the cooling rack, the house smelled like I was baking all day. Add a cup of coffee and you have a perfect setting. They loved the cookies as much as I did and so will you. Hope you get a chance to try this recipe. Most of the ingredients you probably have in the house already.

    Ingredients:

    • 2 1/2 cups all-purpose flour
    • 1 teaspoon baking powder
    • 1 teaspoon salt
    • 1 stick unsalted butter, softened
    • 2 cups sugar
    • 2 eggs
    • 1 (15-ounce) container whole milk ricotta cheese
    • 3 tablespoons lemon juice
    • 1 lemon, zested


    Preheat the oven to 375 degrees F.

    In a medium bowl combine the flour, baking powder and salt. Set aside.

    In a large bowl combine the butter and sugar. Using an electric mixer beat the butter and sugar until light and fluffy, about 3 minutes. Add the eggs, 1 at a time, beating until incorporated. Add the ricotta cheese, lemon juice and lemon zest. Beat to combine. Stir in the dry ingredients.

    Line 2 baking sheets with parchment paper. Spoon the dough (about 2 tablespoons for each cookie) onto the baking sheets.

    Bake for 15 minutes until slightly golden at the edges. Remove from the oven and let the cookies rest on baking rack for 20 minutes before glazing.

    Glaze:

    • 1 1/2 cups powdered sugar
    • 3 tablespoons lemon juice
    • 1 lemon, zested


    Combine the powdered sugar, lemon juice and lemon zest in a small bowl and stir until smooth. Spoon about 1/2 teaspoon onto each cookie and use the back of the spoon to gentle spread. Let the glaze harden for about 2 hours.

    Source: Giada De Laurentiis, Everyday Italian, FoodNetwork.com 9/25/08, Episode: Care Package

    Thursday, September 18, 2008

    Vanilla Ice Cream Pie with Warm Berry Compote


    As you can probably tell by now, desserts are my favorite (maybe that is why I can't lose weight). Well anyway, I saw this recipe in Bon Appetit Magazine and I couldn't resist trying it. It's basically a semi-homemade recipe that requires very few ingredients, it's quick to put together and can be made one day ahead. I followed the recipe and made the Compote right before we were ready to have dessert, however, next time I will just make it ahead and reheat. I'm not sure what I was thinking, but I spooned the Compote onto each slice of pie when it was HOT....not the brighest idea on my part. Of course, the ice cream started melting a little faster than normal and my picture isn't the best, but you get the idea. Also I am sure any of your favorite ice cream flavors will work, I stuck to the recipe (even though chocolate is my favorite) and it was a delicious, light and refreshing dessert.

    Ingredients:


    • 1 quart vanilla ice cream, slightly softened
    • 1 9-inch prepared chocolate-cooked pie crust or graham-cracker pie crust
    • 1/3 cup chocolate syrup (in quirt bottle)
    • 2 tablespoons toasted almonds, chopped, if desired
    • 2 6-ounce containers blueberries
    • 2 6-ounce containers raspberries
    • 2 6-ounce containers blackberries
    • 2 tablespoons water
    • 2 tablespoons brown sugar
    • Mint for decoration, if desired

    Spoon softened ice cream into crust; smooth top.

    Squeeze chocolate syrup in straight lines over pie, spacing 1/2 inch aparts. Draw tip of knife through chocolate lines, forming chevron pattern. Sprinkle with almonds, if desired and then freeze untl firm.I'm not that good that putting a design pattern on cakes or pies and did mess this one up a bit, but you should have seen everyone's eyes pop out when I took the pie out of the freezer. I even impressed myself with this one.

    To prepare Compote: bring all berries, 2 tablespoons water and brown sugar to simmer in a medium saucepan over medium-high heat. Cook until sauce thickens, stirring gently, about 4 minutes; remove from heat and let cool slightly.

    Cut pie into wedges; place on plates and spoon warm sauce over. Decorate with mint, if desired.


    Source: Bon Appetit Magazine, Volume 52 Number 7, July 2007

    Sunday, September 7, 2008

    Tiramisu


    Tiramisu is a dessert most people would order in a restaurant but never attempt to make at home. I love desserts, but I have to admit Tiramisu wasn't really my favorite. However, I always wanted to try and make it, but most recipes I came across seemed too complicated. That was until I found Ina Garten's recipe in the Barefoot Contessa Family Style Cookbook. I actually have been looking at the recipe for quite some time while reading and re-reading the ingredients on how to put it together. It appeared much too easy so I thought there was something I was missing. Well, I finally got up enough courage to try it. Italian night at our community center was coming up and I thought it would be something different that everyone would enjoy(that is if it tasted okay once I got done with it). To be safe, I decided to do a trial run and in addition to my husband, got some neighbors to do a taste test also. Guess what....not only was it super easy to make, but everyone loved it, including me, it got even better after it aged for a couple of days. I hope you give this recipe a try. I am not kidding when I say it is really simple. As a matter of fact the whole time I was making it, I kept saying..."it will be a miracle if this tastes good because it is way, way to easy". My husband kept coming into the kitchen to see why I was talking to myself.

    Just a warning it is not a cheap dessert to make, but again it is well worth it. I was familiar with Mascarpone Cheese (Italian Cream Cheese) because I have used it other recipes. It can be found with the specialty cheeses near the deli counter in your supermarket. The Italian Ladyfingers I found in the cookie aisle with the specialty cookies (do not substitue with ladyfingers in the bakery department, they are too soft). I ended up finding a brand by Alessi that was labeled Biscotti Savoiardi Lady Fingers. If you can't find the Mascarpone or Italian Ladyfingers in the supermarket, you may have to try an Italian Speciality Store in your area. However, I don't think you will have a problem finding either in your local supermarket.


    Ingredients:

    • 6 extra large egg yolks, at room temperature
    • 1/4 cup sugar
    • 1/2 cup good dark rum, divided
    • 1 1/2 cups brewed espresso, divided
    • 16 to 17 ounces mascarpone cheese
    • 30 Italian Ladyfingers, or savoiardi
    • Bittersweet chocolate, shaved or grated
    • Confectioners' sugar (optional)


    Whisk eggs and sugar with electric mixer on high speed for 5 minutes until very thick and light yellow. Lower the speed to medium and add 1/4 cup of rum, 1/4 cup of espresso and the mascarpone cheese. Whisk until smooth.

    Combine the remaining 1/4 cup rum and 1 1/4 cups espresso in a shallow bowl. Dip one side of each ladyfinger in the espresso-rum mixture and line the bottom of a 9 x 12 x 2-inch dish. Pour half the espresso cream mixture evenly on top. Dip one side of remaining ladyfingers in the espresso-rum mixture and place them in a second layer in the dish. Pour the rest of the espresso cream over the top. Smooth the top and cover with plastic wrap. Refrigerate overnight.

    Before serving, sprinkle the top with shaved chocolate and dust lightly with confectioners' sugar, if desired.

    To make espresso for this recipe in your electric drip coffee maker, use 1/3 cup of ground espresso and enough water for 4 cups of coffee. I was tempted to buy instant espresso but didn't want to mess up the recipe so I bought ground espresso coffee and followed the recipe above for making it my electric drip coffee maker. It actually was cheaper to buy the ground espresso rather than buying instant espresso.

    To shave chocolate, use a vegetable peeler on a bar of chocolate.

    Source: Ina Garten, Barefoot Contessa Family Style, 2002

    Monday, September 1, 2008

    Pineapple Upside-Down Cake


    Upside-down cakes don't get enough credit. Think about it... when was the last time you made an upside-down cake or when was the last time you were served upside-down cake at a party or at a restaurant? Bet you can't remember. It's probably one of the quickest cakes to make and it can be made with any fresh or canned fruit that you have available. I made this cake with fresh pineapple, but peaches, mangos, apples work well too. Use whatever fruit you have available because, if I had to guess, you probably have the rest of the ingredients needed to make upside-down cake in your pantry already. Thus, no trip to the supermarket. See you've saved yourself time already so get baking and surprise your family with something different for dessert tonight.

    Ingredients:

    • 5 rings of fresh pineapple, if you are using canned fruit you will need 30 ounce can, drained thoroughly, reserving 1/2 cup of juice
    • 1 cup butter, melted (you will be using 1/4 cup for base and 3/4 cup for cake)
    • 2 tablespoons brown sugar
    • 1 cup all-purpose flour
    • 1 teaspoon baking powder
    • 1/8 teaspoon salt
    • 1 teaspoon pure almond or vanilla extract
    • 1 cup sugar
    • 2 eggs, lightly beaten


    Preheat oven to 350 degrees F.

    Melt 1/4 cup of butter in pan and stir in 2 tablespoons of brown sugar until blended well. Pour mixture into 8 or 9 inch pan coating sides and bottom of pan.

    Arrange fruit on top of the butter and brown sugar mixture in any design you want (be creative). If you are using peaches, apples or mangos you may want to overlap the fruit. For the pineapple upside cake I added cherries for color. See photo below of how fruit was arranged in the bottom of the pan before the batter was added.

    In a large bowl sift flour, baking powder and salt, set aside. Next combine 3/4 cup of butter and granulated sugar in a pan stirring over low heat until sugar is dissolved. Remove from the heat and add almond or vanilla extract. Then add butter mixture to dry ingredients. Stir until just combined and then add eggs. Mix well.

    Pour mixture over fruit slices. Bake 55 minutes or until toothpick comes out clean when inserted. Let cake stand for 10 minutes before inverting on the serving plate.


    Note: If you are using canned fruit, you can reserve 1/2 cup of the juice and add it to the butter and granulated sugar mixture. Leave out the extract if you use the fruit juice.

    Don't you just want to bite into this cake now!!!

    Sunday, August 24, 2008

    Garlic and Herb Tomatoes


    Looking for a vegetable dish that is quick and flavorful?? Look no further because this recipe for Garlic and Herb Tomatoes by Ina Garten is the one. The fresh herbs and garlic sauted in olive oil is the perfect combination over tomatoes. The taste is so fresh you will find yourself going back for a second helping. I used grape tomatoes both times I made this recipe because they were more readily available than the cherry tomatoes. I also prepped everything ahead of time. By getting the tomatoes rinsed, garlic and herbs chopped and measured out, even measuring out the olive oil in the pan made everything much easier (not to mention no mess when guests arrived). When we were ready to eat dinner, all I had to do is heat the oil, saute the garlic for a few minutes and then throw in the tomatoes, herbs, salt and pepper and I was done. Give this recipe a try, you will use it over and over again. Oh, just a warning, you may not have any leftovers so when your guests are not looking, set aside a few of the garlic and herb tomatoes for yourself to eat as a snack later. Enjoy!

    Ingredients:

    • 3 tablespoons olive oil
    • 2 teaspoons minced garlic (2 cloves)
    • 2 pints cherry or grape tomatoes
    • 2 tablespoons chopped fresh basil, plus more for garnish
    • 2 tablespoons chopped fresh flat-leaf parsley, plus more for garnish
    • 2 teaspoons chopped fresh thyme leaves
    • 1 teaspoon kosher salt
    • 1/4 teaspoon freshly groud black pepper


    Heat olive oil in a saute pan large enough to hold all the tomatoes in one layer. Add the garlic to the oil and cook over medium heat for 30 seconds. Add the tomatoes, basil, parsley, thyme, salt and pepper. Reduce the heat to low and cook for 5 to 7 minutes, tossing occasionally, until the tomatoes begin to lose their firm shape. Sprinkle with a little fresh chopped basil and parsley and serve hot or at room temperature.


    Source: Ina Garten, Barefoot Contessa at Home, 2006

    Saturday, August 9, 2008

    Chocolate Ganache Cake


    I was looking for a quick dessert to serve the other day and came across this recipe from one of my Ina Garten Barefoot Contessa cookbooks. I had never actually tried to make this cake before, however, I have to admit, my mouth watered every time I looked at the picture in the cookbook. I had all the ingredients in the house except for the hersey's chocolate syrup so I thought I'd give it a try. This recipe is definitely a keeper, not only because it was delicious, but it was so easy to make and it required very few ingredients. Before you try making it, let me mention a couple of things I had to do differently. The recipe advises not to overbake. I found that I did have to bake it longer than the recipe recommends in my oven. Even though the cake is suppose to be very moist, I found the cake still very wet in the middle when I bake for the recommended 45 minutes. So I ended up baking it a few minutes more. Just keep that in mind when you try this recipe because ovens bake differently. Also it recommends glazing the cake while on a wire rack. I glazed it on the cake dish because I wasn't really sure how to easily get the frosted cake from the wire rack to the cake dish without making a mess of the cake. It didn't look picture perfect on my cake dish, but the taste.....it was amazing.

    Ingredients for cake:

    • 1/4 pound unsalted butter at room temperature
    • 1 cup sugar
    • 4 extra-large eggs at room temperature
    • 1 16 ounce can Hershey's chocolate syrup
    • 1 tablespoon pure vanilla extract
    • 1 cup all-purpose flour

    Ingredients for ganache:

    • 1/2 cup heavy cream
    • 8 ounces good semisweet chocolate chips
    • 1 teaspoon instant coffee granules

    Preheat oven to 325 degrees F. Butter and flour a 8-inch round cake pan, then line the bottom with parchment paper.

    Cream the butter and sugar together with mixer. Add the eggs, one at a time. Mix in the chocolate syrup and vanilla. Add the flour and mix until just combined. Don't overbeat, or the cake will be tough.

    Pour the batter into the pan and bake for 40 to 45 minutes, or until just set in the middle. Don't overbake! Let cool thoroughly in the pan.

    For the ganache, cook the heavy cream, chocolate chips and instant coffee in the top of a double boiler over simmering water until smooth and warm, stirring occasionally.

    Place the cake upside down on a wire rack and pour the glaze evenly over the top, making sure to cover the entire cake and sides. You can tilt the rack to smooth the glaze. Decorate with candied violets, if desired.

    Do not refrigerate.


    The recipe states you can make this cake up to a week in advance. It recommends wrapping it tightly with plastic and refrigerate. Glaze it the day you serve it.

    Source: Ina Garten, Barefoot Contessa Parties, 2001

    Sunday, July 20, 2008

    California Ice Tea


    During the summer I always made what I called Ice Tea/Lemonade. My kids loved it because it was a mixture of both. Of course, I was using the powdered ice tea and lemonade mix. That is before I discovered that making recipes from scratch isn't really that hard. Here is another Ina Garten recipe called California Ice Tea which is a mixture of ice tea and lemons that reminded me of what I use to make for the kids but much better and less expensive to make. Give it a try, I think you will find you will no longer be buying the powdered stuff after tasting this.

    Ingredients:

    • 4 tea bags
    • 1 cup freshly squeezed lemon juice (5 to 6 lemons)
    • 1/2 to 3/4 cup superfine sugar, to taste
    • 3 lemon slices

    Steep the 4 tea bags in 4 cups of boiling water for 10 minutes. Discard the tea bags and allow the tea to cool.

    Combine the lemon juice, sugar and 4 cups of cold water in a large pitcher. Add the tea and lemon slices. Serve over ice.

    Source: Ina Garten, Barefoot Contessa, Television Food Network, Episoide #IG0902, www.foodnetwork.com 2006

    Saturday, July 12, 2008

    Chicken Francese with Lemon and Pecorino


    Looking for an elegant dinner for two? This recipe has several steps to it, but is well worth the effort and it's better than what you would get in a restaurant. Our son, who really never did much cooking, other than making eggs for breakfast, actually was the one who made it for us after watching it done on the food network. We were blown away with how delicious it was.

    Ingredients:

    • 1/2 Pound boneless, skinless chicken breast
    • 2 Heaping tablespoons of finely grated pecorino cheese
    • 4 Tablespoons very finely chopped parsley
    • 1 Egg, beaten well
    • Flour for dredging
    • 1/4 Cup olive oil
    • 1/2 Cup dry white wine
    • 1 Cup chicken stock
    • 6 thin, round slices of lemon, seeds removed
    • 2 Tablespoons butter

    Cut the chicken breasts into 6 pieces of roughly equal size. Place the pieces between sheets of waxed paper and pound with a mallet until they are thin. Season with salt and pepper. Place pecorino cheese and parsley in a wide, shallow bowl. Slowly add the beaten egg, whisking until it's smoothly incorporated.

    Place the four in a wide plate. Dip the pounded chicken in the egg mixture. Remove, letting excess egg drip off. Place each cutlet in the flour and coat lightly. Remove from flour and hold them in a single layer.

    Add the olive oil to a saute pan large enough to hold the 6 cutlets in a single layer. Place over medium-high heat. When the oil is hot, add the cutlets. Saute, turning once, until the cutlets are golden on the outside, just cooked on the inside (about 2 minutes per side). Remove the cutlets and hold them in a single layer.

    Drain the oil out of the saute pan. Return the pan to high heat. Add the white wine and reduce it to 2 tablespoons. Add the chicken stock and the lemon slices. Boil for 5 minutes, then remove the lemon slices. Keep boiling the sauce until it's reduced to 1/2 cup. Turn the heat to very low. Swirl in the butter until the sauce is thickened. Add the reserved chicken, turning the chicken until it is coated in the sauce.

    Divide cutlets among 2 plates, pour remaining sauce over them, sprinkle with remaining 2 tablespopns of parsley and serve immediately.

    Source: David Rosengarten, Television Food Network, Episode#: CL9498, 2006

    Friday, June 27, 2008

    Spinach & Bow Tie Pasta


    Here is an Ina Garten recipe that I got my family and friends hooked on. Ina's recipe is called "Broccoli and Bow Ties" and it can be served as a side dish or by itself. I started making it with fresh spinach for something different and yes, I have to admit, I wanted to use up the spinach I had in the fridge. By using the spinach I also cut out having to cook the broccoli because I used the fresh, pre-washed spinach in a bag. This is another recipe that can be made ahead and reheated when ready to serve. The recipe below has been doubled already because I like leftovers and I am sure you will too.

    Ingredients:

    • Kosher salt
    • 1 Large bag fresh, pre-washed spinach
    • 1 Pound farfalle (bow tie) pasta
    • 4 tablespoons unsalted butter
    • 4 tablespoons good olive oil
    • 2 teaspoons minced garlic
    • Zest of 2 lemon
    • 1 teaspoon freshly ground black pepper
    • 2 teaspoons salt
    • 2 tablespoon freshly squeezed lemon juice
    • 1/2 cup toasted pignoli (pine)nuts
    • Parmesan cheese, optional


    Cook pasta in a large pot of boiling salted water according to the package directions, about 12 minutes.

    In a small pan, toast pignoli nuts being careful not to burn (you just want them lighltly browned). Remove from burner when done and set aside.

    When pasta is almost done, melt butter and oil together in a small saute pan. Next add garlic and lemon zest. Cook over medium-low heat for 1 minute.

    Remove butter/oil mixture from burner and add salt, pepper and the lemon juice.

    When pasta done, drain well and put in large bowl (do not rinse pasta). Add fresh spinach and pour butter/oil mixture on top of pasta and spinach.

    Fold all ingredients together, adding pignoli nuts and parmesan cheese until well combined.

    IF MAKING WITH BROCCOLI: Cook the broccoli for 3 minutes in a large pot of boiling salted water. Remove the broccoli from the water with a slotted spoon, place in large bowl and set aside. When broccoli is removed from water, add pasta and cook.

    Source: Ina Garten, Barefoot Contessa Family Style,2002

    Friday, June 20, 2008

    Poorman's Supper


    Here is a quick meal that some of you may have already tried. Evidently it's been around a long time, but I recently got the recipe from a friend at work. It reminds me of beef stroganoff only with hamburg, thus the name Poorman's Supper. It's easy to make especially if you don't have a lot of time and can be made ahead and reheated. Serve it with a salad (the red leaf lettuce in the picture is from the Farmers Market) and you are good to go.

    Ingredients:

    • 1 Tablespoon olive oil
    • 1 Small onion, chopped
    • 2 Cloves garlic, chopped
    • 1 8 ounce container sour cream
    • 1 8 ounce can mushroom pieces, drained (fresh mushrooms are even better)
    • 1 10 oz. can cream of mushroom soup
    • 1/3 to 1/2 cup milk
    • 1 lb. ground beef
    • 1 lb. box rotini (cork screw pasta), cooked
    • Parmesan cheese to taste
    • Salt and Pepper to taste


    In large pot of boiling salted water, cook pasta until firm (al dente).

    In another pan, saute the onions and garlic in olive oil.

    Add ground beef and mushrooms. Season with salt and pepper until cooked thoroughly. Once complete, drain the grease from the pan.

    Add the soup and milk to the beef mixture, stirring until blended. Continue cooking on medium heat for 5 more minutes.

    Drain the pasta and fold into the beef mixture. Once blended, stir in the sour cream and continue to cook on medium low heat for 5 to 10 minutes.

    Season with salt, pepper and parmesan cheese and serve.

    Saturday, June 7, 2008

    Zucchini Bread


    On a recent trip to the local farmers market, I bought three large zucchinis (they were three for $2.00 so I couldn't resist). I had originally planned to make two loaves of zucchini bread, but ended up with four loaves of bread and 18 muffins. Luckily the zucchini bread and muffins freeze well. I have tried alot of zucchini bread recipes but this one seems to get rave reviews whenever I serve it. I think putting the crushed pineapple in it makes it different and really moist.

    Ingredients:
    • 4 eggs
    • 2 cups granulated sugar
    • 1 cup oil
    • 1 teaspoon vanilla
    • 3 1/2 cups unsifted unbleached all purpose flour
    • 1 1/2 teaspoons baking soda
    • 1 1/2 teaspoons salt
    • 1 teaspoon cinnamon
    • 2 cups zucchini (cut ends off and grate with skin on)
    • 3/4 teaspoon baking powder
    • 1 cup crushed pineapple crushed, drained
    • 1 cup raisins (optional)
    • 1 cup finely chopped walnuts (optional)


    Grease and flour 2 2-lb loaf pans and preheat oven to 350 degrees F.

    Grate zucchini and let drain in a colander.


    In a large bowl beat eggs. Gradually add sugar, then oil, then vanilla.

    In another bowl measure out all dry ingredients(flour, baking soda, salt, cinnamon and baking powder).

    Stir dry ingredients into wet ingredients until blended.

    Squeeze excess water out of zucchini and fold into batter.

    Fold in crushed pineapple and if desired, raisins or walnuts.

    Bake onlowest rack of oven 55 minutes, let stand 10 minutes and remove from pans.

    Sunday, June 1, 2008

    Fresh Produce: My Weekly Farmers Market Trip

    Produce from the Local Farmers Market in our area
    Fruits and vegetables can be found at local Farmers Markets now that summer is fast approaching. Not only is everything fresh, but the price is right too. Luckily in our area we have a farmers market year round. Now that my husband and I are hooked, we have made it a ritual visiting the farmers market on Saturday's to get our fruit and veggies. Of course, we have to stop for breakfast on the way back home(food shopping makes me hungry). Since finding the local farmers market, we don't even buy produce in the supermarket anymore. The potatoes are unbelievable, along with the green beans, zucchini, red leaf lettuce, peaches, and vine ripe tomatoes. I could go on and on.The Local Farmers Market in our area Last week I made zucchini bread and muffins(I will put the recipe on the next blog). Tonight we are trying the corn on the cobb.....can't wait for dinner! The Local Farmers Market in our area
    Look online for farmers markets in your area, I think you will find yourself going back weekly to get your produce there too
    .
    The Local Farmers Market in our area

    Sunday, May 25, 2008

    My Man Cookies


    Here is a recipe for all you coconut/oatmeal lovers. Actually, I found that people who tell me they don't like coconut are the ones who are asking for the recipe first. The story of how my family actually acquired this recipe is cute so I wanted to share it with you. My family ran a small grocery/deli in our town. One of the services we offered was delivering groceries to homes. You have to remember, I'm going back 45 plus years ago. Customers would call their grocery order into the store and my grandfather, father and brother would take turns making the deliveries to their home. Well, one day Mrs. Tate, one of our good customers, called in an order and my brother headed over to her house to make the delivery. Upon arriving, he was greeted by the smell of freshly baked cookies. Mrs. Tate insisted he try some cookies and before he left she gave him some to share with the rest of us. Of course, we all loved them and my mom called her right away to get the recipe. So not only are these cookies delicious and easy to make, but it brings back fond memories every time I make them. Enjoy!

    Preheat oven to 325 degrees F.

    Cream Together:

    • 1 cup butter (2 sticks)
    • 1 cup brown sugar
    • 1 cup granulated sugar
    • 2 eggs
    • 2 teaspoons vanilla extract


    Stir in:

    • 2 cups flour
    • 1 teaspoon salt
    • 1 teaspoon baking powder
    • 1 teaspoon baking soda
    • 1 cup shredded coconut
    • 1 cup finely chopped walnuts
    • 2 cups oatmeal (I used quick cooking or 1 minute oats)


    Using a small ice cream scoop, drop dough onto a cookie sheet and bake 12-15 minutes or until lightly brown.

    Sunday, May 18, 2008

    Lemon Delight


    This recipe has been around a long time. You make it in stages so it sounds like alot of work, but really it isn't. The nice thing about this recipe is that you can change the pudding to whatever you like best. I like to use pistachio pudding around Christmas or St. Patrick's day because of the green color. Chocolate pudding is, of course, my favorite. Also, if you don't like cool whip topping you can use homemade whipped cream. I tried using homemade whipped cream when I made this lemon delight recently and it was outstanding. My concern was that the homemade whipped cream would separate over time, but thanks to a neighbor's idea I was able to stiffen up the whipped topping so that it would stay together(see hint below). The lemon delight is really delightful and you will find yourself saying, can I have a second piece please!

    Ingredients for crust: Mix together by hand

    • 2 sticks of butter, softened
    • 2 cups flour
    • 1/2 cup chopped walnuts (optional)

    Spread above mixed ingredients in a 9x13 glass dish, bake at 400 degrees for 20 minutes or until light brown. Set aside.

    Ingredients for filling: Beat together with mixer

    • 8 ounce package of cream cheese, softened
    • 1 cup confectionary sugar
    • 1/2 of 9 ounce carton cool whip

    Spread over cooled crust and chill for 1/2 hour.

    Hint: If using homemade whipped cream, measure out or eyeball 4 1/2 cups of whipped cream (do not use stiffening technique below for cream cheese layer).

    Then, beat with mixer below ingredients 3 to 5 minutes or until pudding sets up:

    • 2 packages lemon instant pudding
    • 3 cups cold whole milk

    Spread pudding over cream cheese mixture and chill for 1/2 hour.

    Top with remaining cool whip and decorate with chopped walnuts, if desired.

    Chill. This is best if made the night before so that the dessert can set up well.

    Hint: The rule of thumb for stiffening up homemade whipped cream is for a cup of whipped cream, you will need to mix 1 tablespoon of water to 1 teaspoon of knox gelatin.
    I had to experiment because I had never done this before, so this is what I ended up doing: I started with boiling a few cups of water in a teapot. While water was boiling I started beating with mixer the whipped cream recipe(use your favorite whipped cream recipe). Before it was blended completely, I stopped and set it aside. Because I didn't know exactly how much of the water and knox geletin I would need to add to the whipping cream, I measured out 4 tablespoons of water into a glass measuring cup and then added 4 teaspoons of knox gelatin and blend well. Make sure to let the water/geletin mixture cool because you don't want it hot when it goes into the whipping cream mixture.

    Then I went back to the whipping cream and starting beating again and at the same time, I started pouring in slowly the water/gelatin mix. You don't need a lot, you will see it stiffening up as you are beating everything together. Again, you will have to experiment.

    Saturday, May 10, 2008

    Spinach and Beef Pasta Salad


    On the way home from work one night I was trying to think what I could make for dinner (you can all admit that you have been there too). I didn't feel like stopping at the supermarket to get something to make, so I was trying to figure out what I could put together using what I had in the fridge. That is when I remembered a Giada DeLaurentiis recipe that I had tried once before called "Penne with Beef and Arugula". I ended up following Giada's recipe, except I used leftover ribeye steak we had grilled a couple of nights before, substitued ziti pasta because I didn't have penne pasta in the pantry and was able to use up some fresh spinach that my husband brought home from the farmers market in place of the arugula. I ended up also adding some cherry tomatoes and a little red onion. Because the steak had already been cooked I couldn't add the herbes de Provence, didn't have any parsley in the house and left out the reserved the pasta water per the recipe. It came out really well, plus I got to use up things in the fridge. The salad dressing is outstanding so hang on to it and use it with other salads. Below is Giada's recipe, but if you have leftovers to use up, make it your own like I did! Enjoy!

    Ingredients:

    • 2 New York strip steaks, about 8 ounces each
    • Salt and freshly ground black pepper
    • 1 teaspoon herbes de Provence
    • 1 garlic clove, minced
    • 3/4 cup plus 3 tablespoons extra-virgin olive oil
    • 1 pound penne pasta
    • 1/4 cup balsamic vinegar
    • 2 tablespoons Dijon mustard
    • 1/4 cup chopped fresh basil
    • 1/4 cup chopped fresh flat-leaf parsley
    • 2 cups chopped arugula

    Season the steak with salt and pepper, herbes de Provence, and the minced garlic. In a skillet, heat 3 tablespoons of the olive oil over medium heat. Cook the steak for about 7 minutes per side. Remove the meat to a cutting board and let it rest while you cook the pasta.

    Bring a large pot of salted water to a boil over high heat. Add the pasta and cook until tender but still firm to the bite, stirring occasionally, 8 to 10 minutes. Drain the pasta, reserving 1/4 cup of the cooking water.

    In a small bowl, whisk together the balsamic vinegar, Dijon mustard, 1/2 teaspoon salt and 1/2 teaspoon pepper, the basil, parsley and 3/4 cup olive oil. Because I was using leftover steak and didn't have garlic on the steak, I minced up the garlic and put it into dressing. In a large bowl, toss the pasta with half of the salad dressing and the reserved pasta water. Set aside.

    Slice the steaks thin and add to the pasta with the arugula. Add more dressing, and season with salt and pepper as needed.

    Source: Everyday Pasta, Giada DeLaurentiis, copyright 2007

    Sunday, May 4, 2008

    Mexican Deep-Dish Pan Pizza


    With Cinco de Mayo coming up this week, our office decided to have another pot-luck luncheon. I wanted to bring something different and usually try out the recipe on my family first, but because it was short notice, I decided to take my chances and make it anyway. I actually thought it was pretty good, however, didn't get the "oh wow" factor from all of my co-workers. I ended up combining two different recipes that I found on foodnetwork.com. I took a Rachael Ray recipe called "Mexican Meat-zza: Mexican Deep-Dish Pan Pizza", but I have to admit I did change it a little bit. I ended up cooking the peppers with the onions and I also made the cornbread from scratch using Tyler Florence's Cornbread recipe(Rachael's cornbread recipe can be found on www.foodnetwork.com). Hope you have a chance to try this recipe and let me know what you think.

    Ingredients for Cornbread:

    • 4 strips thick-cut bacon, chopped
    • 2 cups stone-ground cornmeal, white or yellow
    • 1 cup all-purpose flour
    • 2 tablespoons sugar
    • 2 teaspoons baking powder
    • 2 teaspoons baking soda
    • 2 teaspoons kosher salt
    • 4 large eggs
    • 2 cups milk
    • 2 tablespoons finely chopped chives

    Heat the oven to 375 degrees F.

    Put the bacon into a cold 10-inch cast iron pan and cook over medium heat until the fat is rendered and the bacon bits are crisp. Do not let it burn. Remove the bacon to a paper towel lined plate. Keep the bacon fat in the pan and set aside.

    In a large bowl, whisk together the cormeal, flour, sugar, baking powder, baking soda and salt. In a separate bowl beat the eggs with a whisk until foamy; whisk in the milk. Add the wet ingredients to the dry ingredients and stir just until combined. Fold in the bacon bits and the chives. Pour the batter into the cast iron pan. Bake until a toothpick inserted in the center comes out clean, about 20-25minutes.

    While the cornbread is baking, start on the pizza topping.

    Ingredients for Topping:

    • 2 tablespoons extra-virgin olive oil, 2 turns on the pan
    • 1 pound ground beef
    • 1 small onion, sliced thinly
    • 1/2 red bell pepper, sliced thinly
    • 1 tablespoon chili powder
    • 2 teaspoons ground cumin
    • 2 teaspoons cayenne sauce (I used ground cayenne pepper)
    • Salt to taste
    • 2 1/2 cup shredded cheddar or jack cheese
    • 1 small can, 2 1/4 ounce sliced chiles or jalapenos, drained
    • 2 scallions, chopped
    • 2 small vine ripe tomatoes, seeded and diced
    • 2 tablespoons drained sliced green olives (salad olives)
    • 1 to 2 tablespoons chopped cilantro leaves, optional garnish
    • Mild to medium taco sause to pass at the table

    Pour oil in skillet and cook onion and peppers on medium. When veggies are tender, add the ground beef and as the beef is cooking, add the chili powder, cumin, cayenne and salt until cooked.

    Add beef mixture to top of cooked cornbread and then start adding cheese, jalapenos, scallions, tomatoes, olives.

    Once all the ingredients are on top of the cornbread, return skillet back to the oven on 400 degrees F for 5 minutes or until cheese is melted.

    What is nice about this recipe is that you can make it your own. You can try it with italian sausage and beef combo or just sausage, you can add more cheese and other toppings that you and your family like.

    References:
    Cornbread, Tyler Florence, Television Food Network, copyright, 2006

    Mexican Meat-zza: Mexican Deep Dish Pan Pizza, Rachael Ray, Television Food Network, copyright, 2006

    Sunday, April 27, 2008

    Rustic Escarole and Cabbage Soup


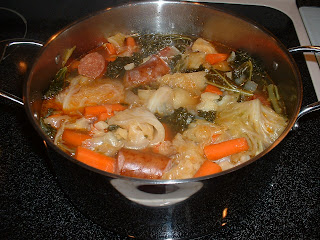
    While dating me, my husband was introduced to a variety of italian foods. His family background is a mix of Irish, German and English, so the extent of eating italian was Spaghetti and Meatballs every couple of weeks. When he first tried this soup, which we actually called "Monast", he enjoyed it so much he actually watched my grandmother make it so he could try it himself. Therefore, I have to admit, I never really made it myself since he got so good at it. Of course, he has altered the recipe a bit and so can you. Just start with basics and add or take out the ingredients as to your liking. Also, the ingredients are roughly chopped so you don't dice everything finely. This is a rustic type soup, so you want to see that there are onions, garlic, etc in the soup. Make it your own. My grandparents and parents owned a small deli so I remember eating this soup with the leftover ends of ham and salami in it, but since my husband likes the pepperoni and kielbasa combo we make it that way.

    Ingredients:

    • 1 32 oz Carton Chicken Stock (we like Kitchen Basic brand)
    • 1&1/2 Sticks Pepperoni, cut in 3/4 inch chunks (we like Boars Head or Marguarita)
    • 1 Ring of Polish Kielbasa, cut in 2 inch chunks
    • 2 Onions, roughly chopped
    • 6 Cloves Garlic, roughly chopped
    • 4 Carrots, cut in chunks
    • 2 Stalks Celery, sliced
    • 2 Medium Size Potatoes, skin on, scrubbed and cut into 4 to 6 piece chunks each
    • 2 Small Heads of Escarole (or 1 large), rinsed thoroughly (we have substitued one bunch of Kale if Escarole was not available in the supermarket)
    • 1/2 Small Head of Cabbage, cut in chunks

    Rinse escarole leaves thoroughly, break into pieces and set aside.

    In a large pot bring to a boil chicken stock and pepperoni.

    Add kielbasa, onions, garlic, carrots, celery, potatoes, escarole and cabbage. Let all ingredients simmer together for approximately 30 minutes, adding 4 to 5 cups of water as needed to keep ingredients covered as it simmers.

    Taste before serving, however, you shouldn't have to season because the pepperoni gives the soup alot of flavor.

    Note: When I was little, my grandmother would break up bread in the bowl and then put the soup over it. To this day, I still eat it that way.

    Friday, April 18, 2008

    Eclair Cake


    This is a light dessert that I got from a coworker awhile ago. There are a few steps to it, but well worth it. It starts with a pastry shell that you make from scratch. I know making a pastry shell from scratch might sound a little intimidating, but it was actually easy. If you are like me, I sometimes have multiple food items going at once. Well, for the pastry, you want to just focus on making that one item to get it the right consistency. Because I made the eclair cake to bring to a party, I couldn't get a picture of what it looks like inside (figured it might be tacky to cut a piece of it), but it really does taste like an eclair.

    Pastry Ingredients:

    • 1 Cup water
    • 1 Stick butter
    • 1 Cup flour
    • 1/4 Teaspoon salt
    • 4 Eggs

    Bring water to a boil in a medium saucepan, lower temperature to medium and add butter. When butter is melted, add flour and salt. Stir vigorously until dough leaves side of pan and forms a ball. Cool slightly off the burner (about 5 minutes). Add eggs, one at a time, stirring completely after each egg addition. Spread dough in a 10x14 pan. Bake at 400 degrees for 35 minutes. Cool and break any bubbles with a fork. Set aside.

    Filling Ingredients:

    • 2 Packages French Vanilla Pudding
    • 1 8 oz Package of cream cheese, softened
    • 2 Cups cold milk (whole milk)
    • 12 oz Container cool whip topping

    In a bowl, mix instant pudding, cream cheese and milk. Beat until smooth. Spread pudding mix on to cooled pastry shell. Then spread cool whip over pudding mixture, Set aside in the refrigerator.

    Frosting Ingredients:

    • 1/2 Cup chocolate chips
    • 1 Tablespoon butter
    • 1 Cup confectioners sugar
    • Milk

    In a small saucepan melt the chocolate chips with the butter. When melted remove from the burner and add confectioners sugar and enough milk so frosting will drizzle.
    Combine well and when cool, drizzle frosting over the cool whip and refrigerate until ready to serve.

    This cake can be made 1 day ahead. Also even though the recipe calls for cool whip topping, I want to experiment using fresh homemade whipping cream(my favorite). Sometimes homemade whipping cream can get runny over time, but one of my neighbors gave me a hint to stiffen the whipping cream so it doesn't get runny. I will give it a try and let you know.

    Saturday, April 12, 2008

    Fresh Baked Cookies Anytime


    Why buy cookies at the supermarket when you can have fresh hot homemade cookies anytime? Rather than share a recipe this week, I'd thought I would share a tip for having fresh baked homemade cookies anytime you want them. Some of you may already tried this, but for those who have not, trust me this tip is a keeper. I have tried it with chocolate chip cookies and oatmeal cookies so far, but I am sure it will work well for any other of your favorite cookie recipes, you just have to experiment a little. Here's what you need to do....

    • Make batter for your favorite cookie.
    • Instead of baking them right away(unless you are like me and can't resist baking just a couple of cookies to eat right away), roll them into balls and place them on a cookie sheet or plate (whatever fits well in your freezer).
    • Freeze the rolled cookie dough (uncovered) for about 20-30 minutes.
    • Removed frozen cookie dough from the freezer and place in a single layer into a ziplock bag.
    • Place the ziplock bag back in the freezer, keeping all the rolled cookie dough flat.
    • Whenever you want a few cookies, take some out of the freezer, place on a cookie sheet and bake according to your cookie recipe.

    Since coming across this method, I find myself mixing up cookie dough batter whenever I have some extra time so that I always have one or two types of cookies ready to use for last minute dessert or just if I want a couple of cookies. You may have already tried baking and freezing baked cookies, but if you follow above tip, you can have "fresh hot homemade cookies" for your family and friends anytime, not to mention your house will smell like you have been baking for hours.

    Friday, April 4, 2008

    Hot Artichoke and Feta Dip


    Are you looking for a quick and easy dip to make? Well, here it is! I actually came across this recipe about ten years ago and made it once. My family loved it, but I noticed that not everyone else at the party enjoyed it as much. I assumed it was because alot of people just don't like artichokes. Honestly, I can't say I was a big fan of artichokes either, but I did like the dip because it was different. Well, a few months ago, I was asked to bring an appetizer to a social in our community and ran across this recipe again while going thru my recipe book. I decided to try it again to see what kind of reaction I would get and guess what, it was a big hit. Since then I have made it several more times and it gets better everytime. Hope you give it a try and let me know what you think.

    Ingredients:

    • 1 Can (14 oz) artichoke hearts, drained and chopped
    • 1 Package (8 oz) feta cheese, crumbled
    • 1 Cup Mayo
    • 1/2 Cup parmesan cheese
    • 1 Jar (2 oz) diced pimientos, drained
    • 1 Clove, garlic, minced

    Mix above ingredients in a bowl.

    Spoon blended ingredients into a 9 inch pie plate or 3 cup shallow baking dish.

    Bake in preheated 350 degree oven for 20 to 25 minutes or until lightly browned.

    Serve with your favorite box of crackers or tostitos.

    To make ahead: Prepare as directed above, except do not bake. Instead cover and refrigerate overnight. When ready to serve, bake uncovered in preheated 350 degree oven for 35 to 40 minutes or until lightly brown.

    Saturday, March 29, 2008

    Cheddar Cheese and Sour Cream Potato Casserole


    If you are bored with making baked, fried or whipped potatoes for dinner, this is the recipe for you! Except from peeling the potatoes (peeling potatoes comes in at a close second to things I hate to do, ironing is still number one).This recipe is really simple to do and you can make it ahead. Just reheat when ready to serve to save you time when preparing dinner(see tip below). I served with dinner, but also found that leftovers freeze well and ended up using it with breakfast too.

    Ingredients:

    • 2 Lbs Potatoes (about 5-6 medium to large potatoes)
    • 1 Can cream of chicken soup, 10 oz. can
    • 1/2 Cup chopped onion
    • 1 Teaspoon salt
    • 1/2 Teaspoon pepper
    • 1 Pint sour cream
    • 2 Cups sharp cheddar cheese, shredded
    • 2 Cups crushed corn flakes(see tip below)


    Peel potatoes and boil in pot of water until potatoes are firm (usually if fork goes into potato easily, they are done). Set aside to cool.

    In the meantime, butter 13x9 casserole dish and then combine together in a separate bowl the soup, onions, salt, pepper, sour cream and cheddar cheese.

    Shred potatoes when cool and then put them into the buttered casserole dish. Pour mixture of soup, onions, etc. over the potatoes and top with crushed corn flakes.

    Melt 1/2 cup of butter in a pan and then pour over the corn flakes.

    Bake in preheated 350 degree oven for 45 minutes.

    TIPS:
  • Rather than crush corn flakes the hard way, I found that Kellogg has "Corn Flake Crumbs" already done in a box. They can be found them in the baking isle.

  • If making this recipe ahead, cut cooking time 15-20 minutes. Before serving just put them in a preheated oven and bake to serve warm.

  • Freeze leftovers. When ready to use just thaw out, put in covered casserole dish and reheat.
  • Thursday, March 20, 2008

    Peach Crumb


    My family loves peach pie, cobbler, you name it and they will like it if it has peaches in it. What I am about to tell you might sound weird, but I have a phobia with touching peaches. It's the fuzzy skin on the peaches that I hate to touch. I know it sounds strange, but it's the truth. Anyway, to make a dessert with peaches, I had to find a way around my phobia, so I came up with an idea...use can peaches! You must be thinking "WHAT" but honestly, it works and it's easy. This recipe is for what I call Peach Crumb. I only came up with this because I was too lazy to make a pie crust or run to the market to buy a pie crust. I had the can peaches in the pantry, mixed up a crumb topping and the Peach Crumb was born. Serve with ice cream or just alone, trust me, everyone will love it.

    Ingredients for filling:

    • 3 Large cans of sliced peaches -- drained
    • 1/2 Cup granulated sugar
    • 1/3 Cup all-purpose flour
    • 1/2 Teaspoon nutmeg
    • 1/2 Teaspoon cinnamon
    • Dash of salt

    Drain the peaches well in a colander (I usually drain them for 1-2 hours). When fully drained, add other ingredients in a large bowl, stir together and set aside.

    Ingredients for Crumb Topping:

    • 1 Cup all-purpose flour
    • 1/2 cup firm butter
    • 1/2 Cup brown sugar -- packed

    Mix crumb topping ingredients together in a separate bowl until crumbly, set aside.

    Then, butter a 1 1/2 quart casserole dish. Pour the filling in the casserole and top with the crumb topping so that the entire filling is covered.

    Bake uncovered in a preheated 425 degree oven for 45-50 minutes. Cover topping with aluminum foil last 10 minutes of baking if you notice the top browning too quickly. Serve warm.

    Oops, almost forgot, make sure you put the casserole dish on a cookie sheet lined with aluminum foil to catch any overflow drippings from messing up your oven.